Showing posts with label green. Show all posts

Tuesday, July 10, 2012

nude + neon + drips

So like...I don't know if you've heard, cus it's still kind of a big secret and no one's really caught onto it yet, but the super hawt trend for this summer is neons. Now shh! Let's keep it under wraps y'all, we don't want 75% of America running around in their super bright crop tops carrying eye-searing Cambridge satchels.

...wait, what's that you say? You already own eighteen neon things? ...well, okay. Never mind, then. But I'm still going to force you to look at this neon mani I just did because I LIKE IT, okay?


I started with two coats of OPI Did You 'Ear About Van Gogh?, a grey-toned nude from their spring 2012 Holland collection. Next, I painted a base for the drips using Sinful Colors Snow Me White, since neons show up much better over white. 


To do the drips, I used my largest dotting tool and made three dots on each  nail, varying in placement. Then I painted a thick french tip and connected the dots to the french tip. If anyone wants a more detailed tutorial, telepathically communicate it to me. Or let me know in the comments. Either works.


Next, I went over the white base of the drips in American Apparel Neon Yellow and China Glaze Shocking Pink. Neons are so damn hard to work with, guys. They're so sheer but dry so slowly. I actually did this mani twice, but the first time it chipped and dented so badly I couldn't even take photos of it, so I had to do it all again the next day. If you're trying drips for the first time, I'd suggest using a very opaque creme polish, because otherwise you might end up tearing all your hair out and collapsing in an exasperated heap on the floor, surrounded by acetone-soaked cotton balls. Or you might just shrug it off. You know, one or the other.

PS--I was serious about the tutorials bit earlier. If you'd like to know in detail how I did any specific manicure, please leave me a comment or send me an email! Pretty please. I want to hear from ALL OF YOU!

Thursday, June 21, 2012

floral + pinstripes

Today I stopped at Payless on my way home from work with one simple mission: buy some of those super no-show socks to wear with flats or pumps.

I left with some of those super no-show socks to wear with flats or pumps...and a bottle of nail polish. (Be proud of me, though. They were buy one, get one 50% off and I only bought one!)


I started with three coats of Essie Marshmallow (my new fav polish, if you haven't already noticed) on my pinky, ring, and thumb, and two coats of American Apparel Mannequin on my ring and index fingers. The forumla of Mannequin, like all AA's cremes, is so, so good. Not too thick, not too thin...goes exactly where you want it and isn't remotely streaky. LOVE. Why aren't all polishes like this?


Then, using my new striping brush, I painted stripes on my pinky, ring, and thumb nails using Brash Green Machine. Here is where I will stress the importance of having a proper striper brush. Til now I was using a couple tiny paintbrushes I got at an art supply store. They worked well enough for things like flowers, but were quite hard to work with for anything else. I don't know why I put off buying legit brushes for so long, especially because this set was only $3.95 with free shipping! It comes with 15 different brushes, which is probably more than I'll ever need, but a striper brush at Sally's probably costs at least $3.95 anyway. Long story short: buy real nail art brushes. They'll make your life so much easier.


I used a dotting tool and Essie Lilacism to make the bases of my flowers, then the striper brush and NYC 006 (only found in Spain) for the dark purple shading and Brash Green Machine for the petals.


Lastly, although Green Machine is a lovely color on its own, it was too bright for the pastel vibe I was going for in this, so I added another coat of Marshmallow on my three stripey fingers to mute the green a bit. Another reason why Marshmallow is such an awesome polish: it makes any bright polish a pastel! So uh, you should buy it already. And Essie should pay me for such dedicated promotion already.

Monday, June 18, 2012

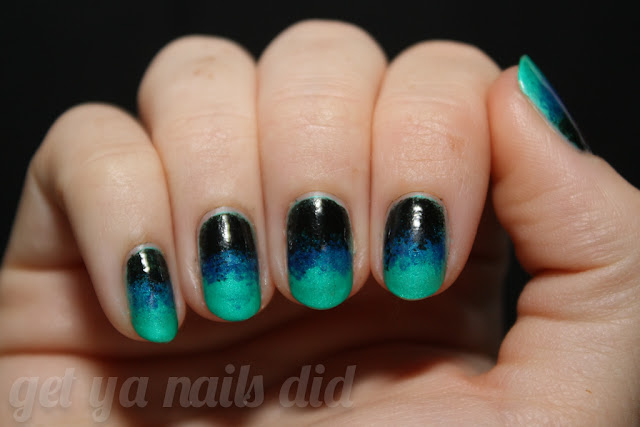
the dark side of gradients

I've been seeing (and doing) so many pastel gradients lately, and they're all incredibly lovely, but I decided to turn that on its head and do an intense, dark gradient. Cus, ya know, I'm a rebel. (I also just had Cool Whip on my strawberries with breakfast. Watch out, y'all, I'm outta control!)


I started with two coats of China Glaze Turned Up Turquoise, an almost-neon polish with a slight shimmer. Like neons, it dries matte and deceptively quickly; though it might feel dry to the touch almost instantly, you do need to wait as long as you would with a non-matte polish, otherwise you risk pulling or other unfortunate impatient-nail-painters' problems.


Then I sponged on Revlon Royal, a gorgeous blue jelly, and Wet n Wild Black Creme. I used a bit of Sammy's gradient technique and a bit of my own; alternating sponging both colors to get a smooth effect (so sponging Royal over Turned Up Turquoise, then sponging more Turned Up Turquoise over Royal, etc.)


It's not my smoothest gradient, but I love the shock of the black with the neon turquoise. Also, this was a beeeeyotch to clean up--I sponged on the black, which meant it was all over my fingers. It looked kinda rad at first--like spray paint outside of a stencil--but then I was like, "Man, I have to douse my skin in acetone to clean it up now," and then I had dry, stained fingers and it was just real rough. A day in the life of a nail addict, dude. Stuff's intense.


Have you tried gradient nails? What are your fav color combos? Has this post inspired you to join...the dark side? (We have Cool Whip and strawberries. You should totes come.)

Monday, April 30, 2012

you can paint your nails lime green, rent yourself a limousine


The other day I was listening to one of my favorite bands in the entire world, Conor Oberst and the Mystic Valley Band, and was immediately inspired after hearing the lyric from "White Shoes": You can paint your nails lime green / rent yourself a limousine. I thought to myself, HEY! I can paint my nails lime green, even though it's the most obnoxious color ever, so I'm GONNA DO IT.


I started with three coats of Essence Lime Up!, which I think is a dupe for OPI Did It On 'Em from the Nicki Minaj collection. The formula for this polish was horrible. It was thick and bubbly and settled unevenly. No bueno.

Then because the lime wasn't eye-searing enough, I decided to freehand stripes in China Glaze Shocking Pink, which is the brightest neon ever. My camera can't capture how bright it is. Just imagine walking into the Barbie aisle at a toy store circa 1996. That bright.


I feel like this pattern could be found on some canvas flip-flops at a really tacky golf course in Miami. Or maybe just a Lacoste trunk show. Maybe I should have put some alligators in there somewhere.


Well, there you have it...the ugliest manicure I've ever done. Sorry your eyes hurt now. Here's a picture of Anderson Cooper holding a really fat cat to make things better:


Tuesday, April 17, 2012

mod sorbet

Because I love you all so very much, I'm going to let you in on a super top-secret nail art tip: gradient manicures are the easiest thing EVER and they look totally awesome. You only need four things: two different shades of polish, a makeup sponge, and a piece of paper.


For this gradient, I used a base of Sally Hansen Xtreme Wear Mint Sorbet. It's a little bluer in real life than it looks in these photos. Then I put a little pool of OPI Mod About You onto a piece of paper, dipped a makeup sponge into it, and applied it to my nail, starting at the tip. I use wedge sponges (you can find a pack for a couple dollars at any drugstore), and one sponge can last forever if you just tear off the bits that have dried polish on them!


It will probably take a few sponged-on coats to get the desired effect. Just remember to always start at the free edge (tip) of your nail, so that is where the color is most concentrated, and work your way towards the cuticle.


See? Totally easy-peasy, and it's great if you're indecisive like me and can't pick just one color to wear. It's the best of both worlds! (Is that Hannah Montana stuck in your head now? Yes? Thought so. Sorry.)

Gradients also look awesome when you use glitter polish, and it's a great way to ease yourself into wearing glitter if you think a full glitter mani is too much. Also, glitter gradients are even easier than this because you can just use the polish brush, like I did in my Hunger Games manicure!

PS--holy cow, my nails are long in this. Never again. I don't get it how girls can function with mile-long acrylics. Do you like, not need to type or text or tie your shoes or do dishes or...?

Friday, April 6, 2012

teacup french


This manicure was inspired by this teacup I found somewhere on the Tumblrsphere. I normally can't stand french manicures--they make me think of high school, when every girl got french tip acrylics for every dance, but this color combination makes the french not quite so tacky.

 I used two coats of Essence Sweet as Candy for the base. It's a sheer light pink that's perfect for covering stains. The gold foil is Essence Shiny Godness, which I love because it's slightly more bronze than most golds, and the green is Essence Viva la Fiesta. First, I freehanded the green using the polish brush, and then added the gold with a small paintbrush.

I really have a thing for Essence polishes and I'm so sad they're not available in the US. When I lived in Spain there was a drugstore right around the corner that sold Essence and whenever I was stressed (which was often) I'd go in and snap up a few bottles. Ahh, retail therapy...