Showing posts with label gradient. Show all posts

Monday, July 16, 2012

hey hey ombré

I was holding off on this manicure for that 9-1-1 emergency moment when I realize I haven't posted in five days...whiiich happened way sooner than I'd have liked it to. I need to step up the regular posting game if I'm ever going to rule the nail art blog world. (Jay kay, I'm pretty sure Chalkboard Nails has that covered. You go, girl.)

Anyway, this is a simple but supa pretty gradient I did a couple weeks ago. There's not a whole bunch to say about it other than I wore it to the Gap and the checker called over two of her coworkers and her manager to look at it, so you know it's gotta be good.


The yellow is two coats of Finger Paints Lemon Sour and the teal is Zoya Wednesday. I used the same gradient technique as always: a makeup sponge and careful blending.


I also got a lot of compliments at work on this one, mostly from men. It's funny--you think men don't notice things like hair and makeup, but I get more comments on my nails from dudes than I do from women. I guess they're more visually aware than women give them credit for!


Blammo. Ombré is my go-to manicure because it's just so flippin' easy. I have another non-ombré post queued up for you, but be on the lookout for more two-tone action cus I have a super rad design I've been itching to try...

Happy two-days-after-Bastille-Day, you guys! I hope you all celebrated appropriately (by eating cheese and lighting some large buildings on fire.)

I really need to work on more cohesive blog post conclusions...

Monday, June 18, 2012

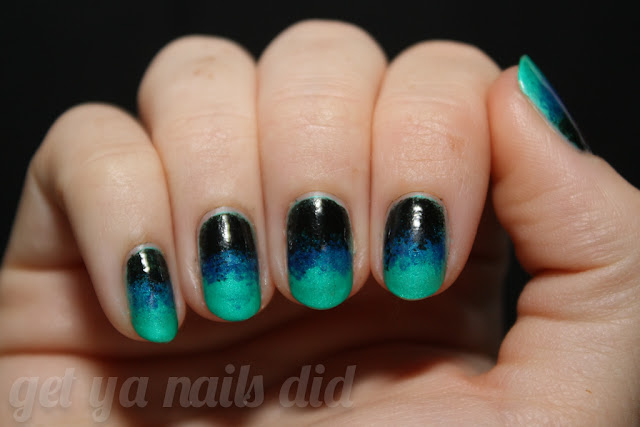
the dark side of gradients

I've been seeing (and doing) so many pastel gradients lately, and they're all incredibly lovely, but I decided to turn that on its head and do an intense, dark gradient. Cus, ya know, I'm a rebel. (I also just had Cool Whip on my strawberries with breakfast. Watch out, y'all, I'm outta control!)


I started with two coats of China Glaze Turned Up Turquoise, an almost-neon polish with a slight shimmer. Like neons, it dries matte and deceptively quickly; though it might feel dry to the touch almost instantly, you do need to wait as long as you would with a non-matte polish, otherwise you risk pulling or other unfortunate impatient-nail-painters' problems.


Then I sponged on Revlon Royal, a gorgeous blue jelly, and Wet n Wild Black Creme. I used a bit of Sammy's gradient technique and a bit of my own; alternating sponging both colors to get a smooth effect (so sponging Royal over Turned Up Turquoise, then sponging more Turned Up Turquoise over Royal, etc.)


It's not my smoothest gradient, but I love the shock of the black with the neon turquoise. Also, this was a beeeeyotch to clean up--I sponged on the black, which meant it was all over my fingers. It looked kinda rad at first--like spray paint outside of a stencil--but then I was like, "Man, I have to douse my skin in acetone to clean it up now," and then I had dry, stained fingers and it was just real rough. A day in the life of a nail addict, dude. Stuff's intense.


Have you tried gradient nails? What are your fav color combos? Has this post inspired you to join...the dark side? (We have Cool Whip and strawberries. You should totes come.)

Tuesday, June 5, 2012

popsicle gradient

If you guys have never seen The Nailasaurus, you've really been missing out. Sammy does some seriously awesome nails and her gradients are the best out there. I did these using her technique and the effect was really stunning--it looked even better in real life, I think here the colors were just too bright to photograph smoothly.


I started with three coats of Zoya Shelby, which is kind of the exact shade of Pepto Bismol and is pretty streaky buuut I still like it. Then using Sammy's gradient technique, I added on Sally Hansen Sun Kissed.  My friend's mom said these look like popsicles, and a middle-aged dad complimented them when I was at work, so basically Sammy's tutorial is the greatest and orange and pink are the perfect summery colors.


Ignore my weird crooked fingers and focus on dat gradient. Smooth as buttah.


The next day I decided to add some nail art and subconsciously ended up copying this manicure by Chelsea from Get Nailed. Hers is a thousand times better than mine sooo I'm a little embarrassed but whateva whateva I do what I want!


All the art was freehanded using a paintbrush that is badly in need of replacing and a dotting tool using China Glaze White on White. 


It didn't show up too much in the photos, but I also added a coat of China Glaze Fairy Dust for a lil bling bling. (Do people still say "bling bling"? Or did that die out with Myspace, velour sweatsuits and the popularity of Nelly's music?)

Tuesday, April 17, 2012

mod sorbet

Because I love you all so very much, I'm going to let you in on a super top-secret nail art tip: gradient manicures are the easiest thing EVER and they look totally awesome. You only need four things: two different shades of polish, a makeup sponge, and a piece of paper.


For this gradient, I used a base of Sally Hansen Xtreme Wear Mint Sorbet. It's a little bluer in real life than it looks in these photos. Then I put a little pool of OPI Mod About You onto a piece of paper, dipped a makeup sponge into it, and applied it to my nail, starting at the tip. I use wedge sponges (you can find a pack for a couple dollars at any drugstore), and one sponge can last forever if you just tear off the bits that have dried polish on them!


It will probably take a few sponged-on coats to get the desired effect. Just remember to always start at the free edge (tip) of your nail, so that is where the color is most concentrated, and work your way towards the cuticle.


See? Totally easy-peasy, and it's great if you're indecisive like me and can't pick just one color to wear. It's the best of both worlds! (Is that Hannah Montana stuck in your head now? Yes? Thought so. Sorry.)

Gradients also look awesome when you use glitter polish, and it's a great way to ease yourself into wearing glitter if you think a full glitter mani is too much. Also, glitter gradients are even easier than this because you can just use the polish brush, like I did in my Hunger Games manicure!

PS--holy cow, my nails are long in this. Never again. I don't get it how girls can function with mile-long acrylics. Do you like, not need to type or text or tie your shoes or do dishes or...?

Sunday, April 15, 2012

girl on fire


I finally got around to ordering a couple polishes from the China Glaze Capital Colours Collection, inspired by the Hunger Games. I wasn't the biggest fan of the collection because I tend to favor bright and light colors over dark, moody ones, but I love the Hunger Games so I had to waste some money on HG-inspired polish.

I fully acknowledge there are about eight million manicures exactly like this floating around the internet, but in my defense I only had about ten minutes to do this manicure and thus couldn't be terribly creative.


I started with two coats of China Glaze Stone Cold, an awesome shimmery matte (!!!) charcoal grey, and then applied China Glaze Electrify to the tips. It's a super bright and shiny mix of gold and red small glitter. Once Electrify dried, I put a coat of Essie Matte About You top coat over just the glitter because I wanted the glitter to match the matte base, but the effect ended up being kind of cloudy and messy-looking. Lesson learned.


So, there you have it! District 12-inspired nails. I'd like to think Cinna would be a fan :)